Tips
Tip: Dropbox Guide
18/06/13 11:11
Here is our short guide to sharing with Dropbox:
To share a folder with another Dropbox user:
1/ open your Dropbox folder on your Mac
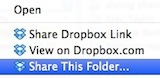
2/ ctrl-click on the folder inside your Dropbox
3/ choose “Share this Folder” from the pop-up menu:
4/ you will be redirected to a web page with these details:
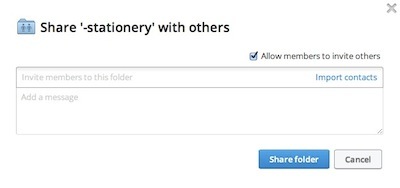

Enter the recipients email address and a note, and you can tick or un-tick the option to let the other person invite people to share this folder (probably best to leave this un-ticked so you control who gets invited).
5/ click "Share Folder" and you are done- they will get an email asking if they want to share. When they click on that link and accept, you will get a email telling you they have joined in.
To share a single file with a non-Dropbox user:
1/ ctrl-click on the file you wish to share inside your Dropbox
2/ choose “Share Dropbox Link” from the pop-up menu:
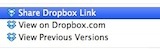
3/ the link is now copied to your clipboard (the memory of the Mac)
4/ now paste the link into your email or other document. You can also test it by pasting it into a Safari window and pressing return- this will sow you what your recipient will see when they use the link.
Note: when the other person receives the link they should click on the “download” or “direct download” button. They do not need to sign up for or sign into a Dropbox account to use this service.
To check that your Dropbox software is updated:
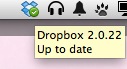
1/ hover over the Dropbox menu extra at the top of the screen- the yellow box will flash up telling you you version number- check this against the latest download from Dropbox: www.dropbox.com/install
:
2/ if you need to update, download it from the webpage
3/ now install the software. Don't just download- you need to open the downloaded file when it is ready and go through the steps to install.
4/ once finished you can check your version by hovering ver the dropbox menu extra at the top of the screen- the yellow box will flash up telling you if you are up to date.
.
To share a folder with another Dropbox user:
1/ open your Dropbox folder on your Mac
2/ ctrl-click on the folder inside your Dropbox
3/ choose “Share this Folder” from the pop-up menu:
4/ you will be redirected to a web page with these details:

Enter the recipients email address and a note, and you can tick or un-tick the option to let the other person invite people to share this folder (probably best to leave this un-ticked so you control who gets invited).
5/ click "Share Folder" and you are done- they will get an email asking if they want to share. When they click on that link and accept, you will get a email telling you they have joined in.
To share a single file with a non-Dropbox user:
1/ ctrl-click on the file you wish to share inside your Dropbox
2/ choose “Share Dropbox Link” from the pop-up menu:
3/ the link is now copied to your clipboard (the memory of the Mac)
4/ now paste the link into your email or other document. You can also test it by pasting it into a Safari window and pressing return- this will sow you what your recipient will see when they use the link.
Note: when the other person receives the link they should click on the “download” or “direct download” button. They do not need to sign up for or sign into a Dropbox account to use this service.
To check that your Dropbox software is updated:
1/ hover over the Dropbox menu extra at the top of the screen- the yellow box will flash up telling you you version number- check this against the latest download from Dropbox: www.dropbox.com/install
:

2/ if you need to update, download it from the webpage
3/ now install the software. Don't just download- you need to open the downloaded file when it is ready and go through the steps to install.
4/ once finished you can check your version by hovering ver the dropbox menu extra at the top of the screen- the yellow box will flash up telling you if you are up to date.
.
Comments
Tip: Using GrandPerspective to Spring Clean Your Mac
08/04/13 10:32
Ever wondered where all of your hard disk space has vanished to? One great software gem is GrandPerspective, as it gives a quick overview of your hard drive and what is using up your space.
GrandPerspective is a free app which scans your HD (or home folder) and gives you a visual overview of the size of the files on your drive. After downloading the .dmg file (from this link), open it and drag the GrandPerspective app to the Applications folder. Then open it from Applications and when it opens, choose “Scan Folder” from the File menu and select your “Home” folder (the one with the house icon in the sidebar!).
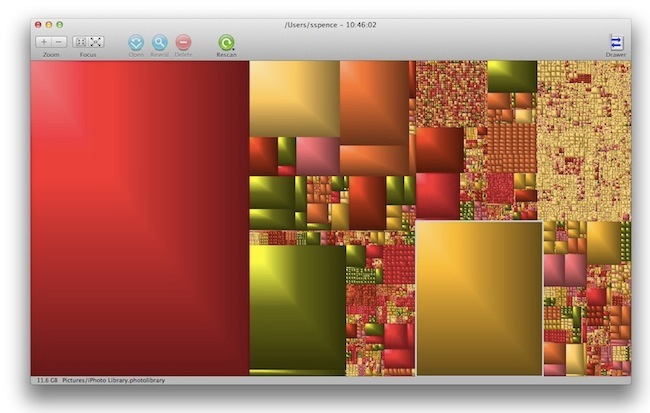
GrandPerspective will scan and then return a visual map of all of the files in your home folder. The large blocks are the memory hogs, the small ones are best left alone. It is likely that your iPhoto library will be one of the large pieces as it contains all of the photos and videos in your iPhoto app.
If you hover the pointer over the large blocks, it will give the location at the bottom of the window. This will help you to look for this file afterwards and possibly delete the file if it is no longer needed.
Remember that once you spring-clean your files, you need to empty the Trash can. Open the Trash and use the “Empty Trash” button in the top right of the window.
GrandPerspective is a free app which scans your HD (or home folder) and gives you a visual overview of the size of the files on your drive. After downloading the .dmg file (from this link), open it and drag the GrandPerspective app to the Applications folder. Then open it from Applications and when it opens, choose “Scan Folder” from the File menu and select your “Home” folder (the one with the house icon in the sidebar!).
GrandPerspective will scan and then return a visual map of all of the files in your home folder. The large blocks are the memory hogs, the small ones are best left alone. It is likely that your iPhoto library will be one of the large pieces as it contains all of the photos and videos in your iPhoto app.
If you hover the pointer over the large blocks, it will give the location at the bottom of the window. This will help you to look for this file afterwards and possibly delete the file if it is no longer needed.
Remember that once you spring-clean your files, you need to empty the Trash can. Open the Trash and use the “Empty Trash” button in the top right of the window.
Tip: Remove Adobe Reader As Your Internet PDF Viewer
24/03/13 10:10
One thing which always irritates us is when an application takes over and there is not an obvious way to stop it. Adobe Reader, Adobe’s PDF viewing application, does exactly this.


If you install Reader it will add some internet plugins for your Safari web browser. This means that when you click to view a PDF on a website, the document opens in the Adobe environment and not using Apple’s built-in Preview app.
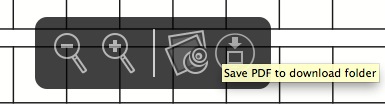
We like the Preview toolbar which appears over a PDF in Safari (above)- we particularly like the button which allows us to open that PDF in the Preview app.
To get rid of the Adobe system and return to using Preview as your default PDF viewer, you need to follow these steps:
1/ open your Mac HD -> Library -> Internet Plugins
2/ move the Adobe plugins to the Trash:

3/ quit and reopen Safari
It is a simple step but not that obvious. There is no option in the Safari extensions preferences to turn off Adobe Reader. However this simple clean-out should do the trick.
.
If you install Reader it will add some internet plugins for your Safari web browser. This means that when you click to view a PDF on a website, the document opens in the Adobe environment and not using Apple’s built-in Preview app.
We like the Preview toolbar which appears over a PDF in Safari (above)- we particularly like the button which allows us to open that PDF in the Preview app.
To get rid of the Adobe system and return to using Preview as your default PDF viewer, you need to follow these steps:
1/ open your Mac HD -> Library -> Internet Plugins
2/ move the Adobe plugins to the Trash:
3/ quit and reopen Safari
It is a simple step but not that obvious. There is no option in the Safari extensions preferences to turn off Adobe Reader. However this simple clean-out should do the trick.
.
OS X Tip: Keyboard Shortcuts
31/01/13 23:12
We have put together two keyboard shortcut sheets, the first with the essentials and the second with a few more advanced suggestions.
We always recommend to clients that they try to adopt a number of shortcuts as they can save lots of time.
Here are the links for the two PDFs:
- Keyboard shortcuts Part 1
- Keyboard shortcuts Part 2.
We always recommend to clients that they try to adopt a number of shortcuts as they can save lots of time.
Here are the links for the two PDFs:
- Keyboard shortcuts Part 1
- Keyboard shortcuts Part 2.
Reeder and Readability: Ways to Manage News on OS X and iOS
23/01/13 14:59
Being able to read news stories each day, and catching up with all of the different articles that cross our path has always been a bit of a problem. For example we would need to visit 20 to 30 websites each day to pull together all of the news articles that we want to glance at concerning Apple.
The way we currently manage this is with a program called Reeder (with a second program called Readability in the background). Reeder gathers together the RSS feeds from each of the websites that we subscribe to.

Here are the steps to set this up for your sites/sources:
1/ set up a Google Reader account (www.google.com/reader). Although you won't be logging into the Google website very often, the Google Reader account forms the backbone of the system that is used for the Reeder application. Once you have set up a Google Reader account you will have set the new login email address and password. Now you are ready to use this in the Reeder application.
2/ the next step is to buy and download the Reeder program from the Mac App Store. It is best to set it up on your Mac first as there will be a little bit of configuration going on and then you can install Reeder on your iOS devices later.
3/ once you download and install Reeder, you need to open it and login to your Google Reader account.
4/ you can add new subscriptions to all of the websites that you wish to use. In Reeder, choose "add subscription" is from the subscriptions menu at the top of the screen.
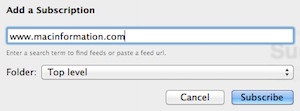
Once you click on the subscribe button, a green "subscribed" icon should appear, showing you are now connected:

Now you can keep adding all of your sites and they will feed headlines and news summaries to your Reeder app.
4/ when you wish to hold a couple of articles aside to be read later, it is best to send them over to the Readability app. In other words, Reeder is used for all fresh headlines and Readability if for digesting the couple of articles which require more attention later in the day.
First you need to download the Readability up on your iOS device such as your iPad or your iPhone. Readability is not available for the Mac (except through Safari), so we find that we catch up on important articles in Readability on the iPad at the end of the day.
5/ next, you need a Readability account which you can set up the first time you use the app.
6/ now you need to return to the Reeder app, and you need to sign into your Readability account inside the Reeder application. In the Reeder menu, choose Preferences -> Services and enter your details. This now links Reeder to Readability.
7/ when you open Reeder it will download the headlines for each of your sites, pulling in any news since your last use of the app. When you tap on a headline and read it, it will disappear as it has been marked as "read". If you read the headline and think that you would like to read the rest of the content later, tap on the Readability icon to add it to the Readability app.
8/ you can open Readability at any stage and read the articles you have filed there.
Think of Reeder as a fishing net scooping up all of the headlines for you- and then Readability is reserved for the best of the catch..
The way we currently manage this is with a program called Reeder (with a second program called Readability in the background). Reeder gathers together the RSS feeds from each of the websites that we subscribe to.
Here are the steps to set this up for your sites/sources:
1/ set up a Google Reader account (www.google.com/reader). Although you won't be logging into the Google website very often, the Google Reader account forms the backbone of the system that is used for the Reeder application. Once you have set up a Google Reader account you will have set the new login email address and password. Now you are ready to use this in the Reeder application.
2/ the next step is to buy and download the Reeder program from the Mac App Store. It is best to set it up on your Mac first as there will be a little bit of configuration going on and then you can install Reeder on your iOS devices later.
3/ once you download and install Reeder, you need to open it and login to your Google Reader account.
4/ you can add new subscriptions to all of the websites that you wish to use. In Reeder, choose "add subscription" is from the subscriptions menu at the top of the screen.
Once you click on the subscribe button, a green "subscribed" icon should appear, showing you are now connected:
Now you can keep adding all of your sites and they will feed headlines and news summaries to your Reeder app.
4/ when you wish to hold a couple of articles aside to be read later, it is best to send them over to the Readability app. In other words, Reeder is used for all fresh headlines and Readability if for digesting the couple of articles which require more attention later in the day.
First you need to download the Readability up on your iOS device such as your iPad or your iPhone. Readability is not available for the Mac (except through Safari), so we find that we catch up on important articles in Readability on the iPad at the end of the day.
5/ next, you need a Readability account which you can set up the first time you use the app.
6/ now you need to return to the Reeder app, and you need to sign into your Readability account inside the Reeder application. In the Reeder menu, choose Preferences -> Services and enter your details. This now links Reeder to Readability.
7/ when you open Reeder it will download the headlines for each of your sites, pulling in any news since your last use of the app. When you tap on a headline and read it, it will disappear as it has been marked as "read". If you read the headline and think that you would like to read the rest of the content later, tap on the Readability icon to add it to the Readability app.
8/ you can open Readability at any stage and read the articles you have filed there.
Think of Reeder as a fishing net scooping up all of the headlines for you- and then Readability is reserved for the best of the catch..
Dealing with broadband providers in Ireland
29/05/09 15:32
Review: Quickoffice Files
07/05/09 15:34
Mac Information Guide: File Sharing Using MobileMe
06/05/09 16:16
Mac Information Guide: Using an iPhone Abroad
20/04/09 14:50
TIP: Screen Sharing with MobileMe
09/03/09 18:12
We have been using MobileMe, and its previous incarnations since .Mac and the early days of iTools (remember that?). The main reason is our personal email address- we would hate to change it at this stage; the idea of giving up MobileMe and losing our @mac.com address is more than one could bear!
However over the years, the internet services from Apple have evolved. Three of the best examples are the iDisk (which we use all of the time to host previews for clients' websites), Galleries for photos (called "homepage" in the .Mac days), and MobileMe screen sharing. This last item is a gem. We have used it to retrieve files, start processing tasks before we return to the office and generally it keeps us in touch with our office Mac.
 .
.
However over the years, the internet services from Apple have evolved. Three of the best examples are the iDisk (which we use all of the time to host previews for clients' websites), Galleries for photos (called "homepage" in the .Mac days), and MobileMe screen sharing. This last item is a gem. We have used it to retrieve files, start processing tasks before we return to the office and generally it keeps us in touch with our office Mac.
.Backups, backups, backups
07/02/09 14:53