Encrypt
Guide: How to setup an encrypted USB stick
26/07/13 14:17 Filed in: OS X
Here is how to setup an encrypted USB stick under Mountain Lion 10.8:
1/ open Disk Utility (Macintosh HD -> Applications -> Utilities)
2/ insert your USB stick and select it on the left hand side of the Disk Utility window. Be careful to select the USB stick and not some other disk such as your backup drive!
3/ with the USB disk selected, click on the “erase” option on the right and set the options as shown here:
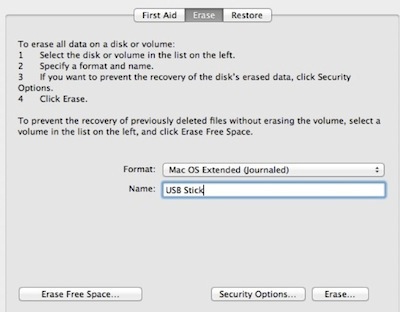
Choose “Mac OS Extended Journaled” and type in a name for your stick.
4/ now click on the “erase” button at the bottom to completely erase the stick.
5/ quit out of Disk Utility.
6/ find the USB stick on your desktop- hold the ctrl key down on the keyboard and click once on the USB stick icon
7/ choose “encrypt xyz” from the pop-up menu to start the process.
8/ you will be asked to enter your encryption password and a hint:
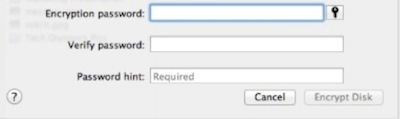
Be careful when doing this because if you forget this password you will not be able to access this drive!
9/ once you have entered the password twice and entered your hint, click on the “encrypt disk” button. This could take a long time. There is also no progress bar telling you how long it will take. Let this process complete and don’t interrupt it.
10/ once completed, eject the disk reconnect it again. You will then be challenged for the password before you can see the disk on the desktop. Enter the password and now copy your material onto the disk.
This will protect your USB drive should you lose it. Encryption means that it is virtually impossible for anyone to crack the password and see your files. It will just give peace of mind for sensitive information. .
1/ open Disk Utility (Macintosh HD -> Applications -> Utilities)
2/ insert your USB stick and select it on the left hand side of the Disk Utility window. Be careful to select the USB stick and not some other disk such as your backup drive!
3/ with the USB disk selected, click on the “erase” option on the right and set the options as shown here:
Choose “Mac OS Extended Journaled” and type in a name for your stick.
4/ now click on the “erase” button at the bottom to completely erase the stick.
5/ quit out of Disk Utility.
6/ find the USB stick on your desktop- hold the ctrl key down on the keyboard and click once on the USB stick icon
7/ choose “encrypt xyz” from the pop-up menu to start the process.
8/ you will be asked to enter your encryption password and a hint:
Be careful when doing this because if you forget this password you will not be able to access this drive!
9/ once you have entered the password twice and entered your hint, click on the “encrypt disk” button. This could take a long time. There is also no progress bar telling you how long it will take. Let this process complete and don’t interrupt it.
10/ once completed, eject the disk reconnect it again. You will then be challenged for the password before you can see the disk on the desktop. Enter the password and now copy your material onto the disk.
This will protect your USB drive should you lose it. Encryption means that it is virtually impossible for anyone to crack the password and see your files. It will just give peace of mind for sensitive information. .
Comments