Adventures in HomeKit: Part 2
Aside from my venture into home lighting this year, I have also looked at other HomeKit devices, including my home gate. During the summer we had a new sliding gate installed and from the outset I had thought about integrating this into our HomeKit system. My goal was to be able to open the gate using Siri on the HomePod, iPhone or Apple Watch.
Gate Industry:
The first challenge here was knowledge- who had it and who didn't. I approached a number of gate installation companies and although any of them would have done an excellent job in adding motor, none of them had knowledge about Apple HomeKit. I had done my homework here and could see that Nice UK gate motors had some information about HomeKit integration. I learnt that the pieces needed to be aligned: a specific Nice sliding gate motor to match the size and weight of the gate, a module to be placed inside the gate motor box to allow a WiFi link, and a WiFi signal which extended to the area around the gate.

For gate motor, I went for a Nice Robus 600 which was a good balance of power and price. I set about installing it at the gate, which involved digging a hole at one side, filling it with concrete and fixing the gate base-plate on top of this, at the right level for the bottom of the gate. This was tricky enough as the motor needs to be carefully positioned so its metal cog wheel is level (to drive the gate) and is in the exact position for the rail. But after a lot of work and repositioning the motor level and angle using the holding bolts, the motor was in place and the gate would slide manually with the lock open. I would unlock the motor with the supplied key, open the lever and the gate could run back and forth.
Electrical Work:
Having installed the gate motor in the correct position, the next steps were the power and sensors. The gate needs its own power supply back to a fuse board and its own isolator switch (you can't just plug it in with an extension cord!). This was the trickiest part- I needed to run cable through outdoor ducting across the drive and then outdoor electrical cable needed to pass through our garage to outside the back door. In the end this cost about €150 for one hours work by a local digger driver and handyman.
The next part was the electrician. There was no way I would attempt this myself. This needed an electrician to link the cable through the wall at the door and into the house to the fuse board. He connected it into the board with its own trip switch, and the line out now has its own switch to power on/off the motor. This was important as during the programming stage, the gate needs to be powered on and off at various times.
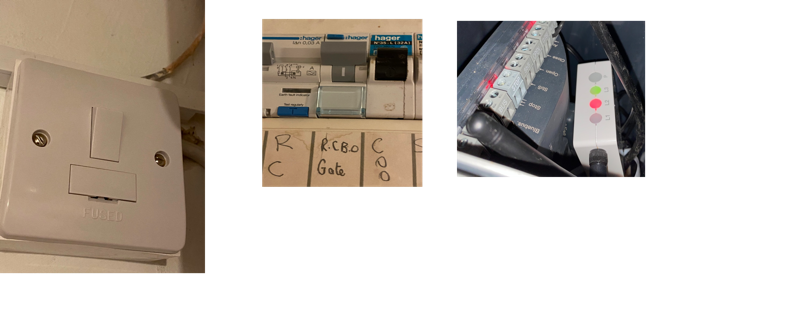
Isolator switch near back door : trip switch on fuse board : WiFi module (IT4WIFI) in gate box
Sensors, Programming and Accessories:
The electrician connected the cable to the Nice motor and once I knew I had (safe) power connected, the rest was over to me. I needed to install the two photocell sensors, which create a beam between each side of the gate. If broken, this signal would stop the gate from closing (for example is a person or car passed through as it was closing). Two photocells came with the motor kit and so I set them up on either side of the posts and linked them back to the “Bluebus” port on the Nice motor.
The final stage before activation was the programming. Nice UK have a number of helpful videos on YouTube which were invaluable. With the gate running smoothly on its rail in manual mode, and with the photocells linked, it was time to turn on the power and go through these steps. The gate has metal stoppers at either end, so the gate can be programmed to know where it runs to. Holding down a few of the buttons on the panel, the gate performs its initial search sequence, running back and forth to learn its end points. Now the gate was ready, and I could open and close it using the open/close buttons on the panel.
Remotes:
I also went the old fashioned way- I bought some remote controls for the gate. These are set up in two parts- first by plugging their radio module into the motor panel so that the gate has a receiver for the remotes. Then each remote is paired with that module. At tis stage I could now open ad close the gate, and be assured that anything breaking the photocells' beam would stop the gate in its tracks.
WiFi:
The next step was to add the gate motor to the house WiFi to add it to HomeKit. Luckily my office WiFi network extends far enough to give good coverage at the gate. I bought Nice's IT4WIFI aerial which plugs into the panel on the motor and lives inside its waterproof plastic covering. This was a simple step as it uses a telephone cable (RJ11), running from the small aerial box to the panel. After this I used the Nice Welcome HK app to add the gate to my network and I had a WiFi controllable gate.
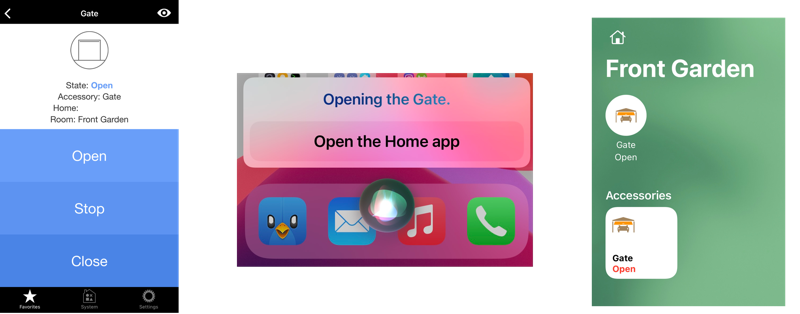
Nice Welcome HK app : Using Siri on iPhone to open the gate : Home app with the gate status
HomeKit:
I could have skipped the Nice Welcome app and gone straight for HomeKit, but I decided to have both. The final stage was to add the gate to the Home app on my iPhone, to assign it to a "room" and name it. This final step integrated the gate into the rest of my home accessories, including lights, dehumidifiers, power sockets and heating.
Now I can activate the gate using my iPhone or Apple Watch by saying: "Hey Siri, open the gate" or "Hey Siri, close the gate". I can ask "Hey Siri, is the gate open?" to check if it is shut at night. One of the best parts is the remote access, and the ability to open the gate as I approach my home in the car. As my Ford has CarPya, and a Siri button on the stalk, I can press the button and say “open the gate”.
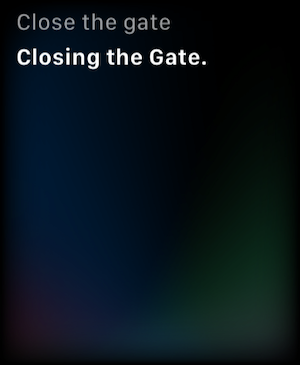
Using my Apple Watch is also great- by holding in the Digital Crown, I can ask Siri to “close the gate” and off it goes. So simple and effective- no messing around with zappers or even apps.
The only slightly fussy device is the HomePod in our kitchen which insists on me “authenticating” on my iPhone before it will complete a gate request, possibly as a away to ensure the person speaking is allowed to control the gate. I can see this as a useful safety feature.
I will need to check the photocells frequently and the gate may need to be serviced every few years, but overall this project was very rewarding and I succeeded in integrating the gate motor to the rest of my HomeKit system.
Apple Beta of 10.10.2
Apple have released the fifth version of the 10.10.2 beta to developers, with a focus on WiFi and Mail.

We have held off giving our full recommendation to Yosemite until now due to the WiFi bug, but hopefully this next update will mean that 10.10 becomes a more stable OS.
Simon Spence/2015